As businesses migrate theirinfrastructure and architecture to reflect a cloud-native, data-driven era,we’ve seen a rise in the topics of cloud computing, containerization, and container orchestration. When bringing up these trends it’s hard to ignore some of the big names, like Kubernetes and Docker, which have for lack of a better word, revolutionized the way we develop and deploy software at scale.
Whether you’re a developer,data scientist, product manager, or something else, there are two tools that you’ll want to become very comfortable with: Docker and Kubernetes.
Docker, the containerization platform, and Kubernetes, the container orchestration platform is both fundamental tools that are crucial to furthering today's skills.
Today, we’ll take a look at:
• What is Docker and Docker containers and why should I use them?
• What is Kubernetes and why should I use it?
• The difference between Docker and Kubernetes
• Docker and Kubernetes: better together
• Getting started with Docker
• Getting started with Kubernetes
What is Docker, and why should we use it?
A Real-Life Scenario: Docker makes it really easy and simple for different people working on a project to run their application in the same environment without any dependencies or OS issue involved as Docker provides its own OS. Consider this before and after scenario:
Before Docker: a developer sends code to a tester but it doesn’t run on the tester’s system due to various dependency issues, however it works fine on the developer’s end.
After Docker: As the tester and developer now have the same system running on Docker container, they both are able to run the application in the Docker environment without having to face differences in dependencies issue as before.
A little more about Docker and containers:
Docker is a containerization platform that packages your application and all its dependencies together in the form of a docker container. It’s a set of platform-as-a-service products designed to solve the many challenges created by the growing DevOps trend. Docker makes it easier to create, deploy, and run applications with the use of containers.
Containers are what make Docker so appealing to the modern developer. They create an abstraction at the app layer that packages your application and dependencies with everything it needs to run including: the operating system, application code, runtime, system tools, system libraries, etc.
Containers take up less space than VMs (container images are typically tens of MBs in size), can handle more applications and require fewer VMs and Operating systems.

Source :https://www.educba.com/docker-vs-vms/
What is Kubernetes, and why should we use it?

Kubernetes is a powerful container management tool that automates the deployment and management of containers. Kubernetes (k8’s) is the next big wave in cloud computing.
When it comes to running containers in production, you can end up with dozens, even thousands of containers over time. These containers need to be deployed, managed, and connected and updated; if you were to do this manually, you’d need an entire team dedicated to this.
It’s not enough to run containers; you need to be able to:
• Integrate and orchestrate these modular parts
• Scale up and scale down based on the demand
• Make them fault tolerant
• Provide communication across a cluster
You might ask: aren’t containers supposed to do all that? The answer is that containers are only a low-level piece of the puzzle. The real benefits are obtained with tools that sit on top of containers — like Kubernetes. These tools are today known as container schedulers.
The difference between Docker and Kubernetes

Let’s preface this by saying that they are two different technologies that are designed to work together. They are not competing tools, so there shouldn’t be any confusion around, “should I use one over the other?” or “which one is better?”. They both have their own roles in DevOps and are frequently used together.
With that said, here’s the difference:
Docker is used to isolate your application into containers. It is used to pack and ship your application.
Kubernetes on the other hand is a container scheduler. It is used to deploy and scale your application.
Docker and Kubernetes: better together

The two technologies are designed to work together, and when they do it’s a DevOps dream. As mentioned earlier in this post, it’s not enough to merely run containers in production, they need to be regulated and Kubernetes offers some great features that make working with containers even easier. Kubernetes offers things like auto-scaling, health checks, and load balancing which are crucial to managing the container lifecycle.
It’s important to get your application containerized, but don’t forget the next step in the process;
How will you run your containers at scale in production? If you answered Kubernetes, you’re correct.
Getting started with Docker
Basic Docker concepts
There are some basic concepts you’ll need to learn and they are:
• Containers
• Images
• Registries
Containers
A container is what you eventually want to run and host in Docker. You can think of it as an isolated machine, or a virtual machine if you prefer.
From a conceptual point of view, a container runs inside the Docker host isolated from the other containers and even the host OS. It cannot see the other containers, physical storage, or get incoming connections unless you explicitly state that it can. It contains everything it needs to run: OS, packages, runtimes, files, environment variables, standard input, and output.
Your typical Docker server would look like this — a host for many containers:
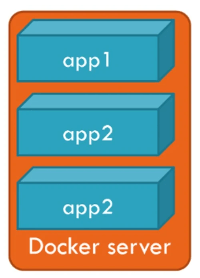
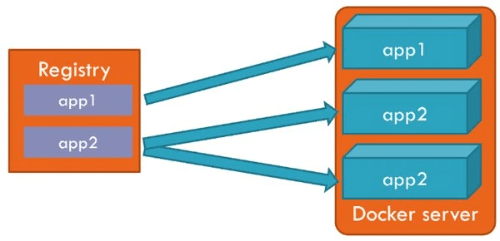
The fact that there are two app2 containers in the schema above is normal; this is typically the case when a server hosts a release and a test version. Which means you could host both versions on the same server.
Images
Any container that runs is created from an image. An image describes everything that is needed to create a container; it’s a template for containers. You may create as many containers as needed from a single image. The whole picture looks like this:

Registries
Images are stored in a registry. In the example above, the app2 image is used to create two containers. Each container lives its own life, and they both share a common root: their image from the registry.
Getting Docker set up and running
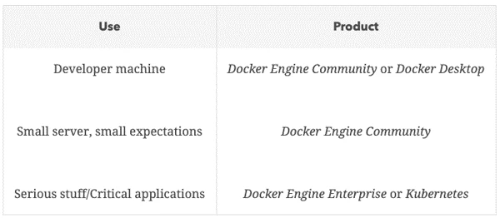
Choosing which Docker product based on requirements
In a production environment that runs containers hosting critical applications, you would rather have your favorite admins install Docker Enterprise.
However, on your development machine or a continuous integration build machine, you can use the free Docker Engine Community or Docker Desktop depending on your machine type. In short:
Hello World Test
Whatever the edition you install, you can check your installation by running the following command in a command line (your terminal on Linux, or PowerShell on Windows):
It should pull an image and display output text that begins with:

Installing Docker — Windows, Linux, Mac
Setting up Docker on Windows 10
Docker Desktop requires a Professional or Enterprise 64-bit edition of Windows 10, because it is based on Hyper-V. If you have a desktop version of Windows that doesn’t meet the requirements, you may use the older Docker Toolbox based on VirtualBox.
Before you install Docker Desktop it’s important that you:
• enable Hyper-V
• enable hardware virtualization in the BIOS
• Then, follow this link and follow the instructions found there.
During installation, you will be prompted whether to use Windows or Linux containers. I’d suggest Linux containers because:
• You can change your mind at any moment later on, just right-click the Docker icon in your toolbar and select “Switch to Windows containers…”
• As of now, most containers images are based on Linux
Setting up Docker on Linux
There are other Docker packages available and you can simply follow the steps depending on your version:
• CentOS 7
Whatever your Linux flavor, there are common post-installation steps here. Make sure that you read them carefully. Double-check them if you cannot successfully run the hello-world test.
Setting up Docker on Mac
Docker Desktop requires a Mac OS Sierra 10.12 or above. If you have an older macOS version, you may use the older Docker Toolbox based on VirtualBox.
Creating your first Docker image
As we saw earlier, containers are created from images. Let’s explore how you can create your own. Inside our images, we can stuff our programs and their dependencies so that multiple containers can be created from those images.
Creating a simple Docker image

Dockerfile
A Docker image is created using the docker build command and a Dockerfile file. The Dockerfile file contains instructions on how the image should be built.
The Dockerfile file can have any name. Naming it Dockerfile makes it easier for others to understand its purpose when they see that file in your project. It also means you don’t need to state the file name when using the docker build command.
Now, let’s create a basic image for a container that displays a “hello world” message when its run.
For this, create a file named Dockerfile that describes how your image should be built. A Dockerfile file always begins with a FROM instruction because every image is based on another base image. This is a powerful feature since it allows you to extend images that may already be complex.
As I only need a simple text output, I can use a Debian Linux image. Here’s my Dockerfile file:
This is not enough. While I do get a Debian Linux basis, I am not running any command that could display “hello world.” This can be achieved using the CMD instruction. The CMD instruction specifies which executable is run when a container is created using your image and provides optional arguments.
Here’s an improved Dockerfile file that creates a Debian Linux-based image and instructs it to greet our users when a container spawns:

Note that both the program to run and its arguments are provided as a JSON array of strings. In order to create an image from my Dockerfile file, I need to run the docker build command. To do this, I type the following command in my terminal in the folder where the Dockerfile file lives:
The -t switch is used in front of the desired image. An image can be created without a name, it would have an auto-generated unique ID, so it is an optional parameter on the docker build command.
Note the dot at the end of the command above. It specifies which path is used as the build context (more about that later), and where the Dockerfile is expected to be found. Should my Dockerfile have another name or live elsewhere, I can add a -f switch in order to provide the file path.
The docker build command just created an image named hello. That image is stored locally on the computer, and you can run it as you would any other image:
From here, you may want to publish your image for others to run containers based on it. We’ll see how to do that a little later but for now, let’s focus on creating images.
Just to make things crystal clear, here’s what was done:
• Created an image
• Created a file named Dockerfile
• Ran a docker build command
• Ran a container from the image created
Let’s expand on what this means; running a container is the virtual equivalent of starting a brand-new machine and then trashing it. In order to print the “Hello world” message, we essentially got a new computer, had it executed an echo command, and then trashed it. Docker makes fire-and-forget computing cheap. Of course, this is overkill for such a simple purpose, but it remains true even when we install frameworks or move files around inside our containers; it’s a fantastic feature. Most of your Docker power will come when you understand how easily you can create and trash isolated virtual computers.
Publishing your Docker image
A Docker Registry is basically an image store that offers the following functions:
• Ability to store various images.
• Ability to store various tags for the same image.
• An HTTP API that allows pushing images from a machine that produces them, or pull images to a machine that runs containers from those images.
• TLS-secured connection to the API in order to avoid man-in-the-middle attacks.
There are many registries available. You can use the publicly available Docker Hub or use a private registry of your own. In any case, the process to tag and publish your images remains the same for every registry.
Whichever Registry you choose, publishing an image is a three-step process:
1. Build your image (docker build) with the appropriate prefix name or tag (docker tag) an existing one appropriately.
2. Log into the Registry (docker login).
3. Push the image into the Registry (docker push).